Hello and welcome!
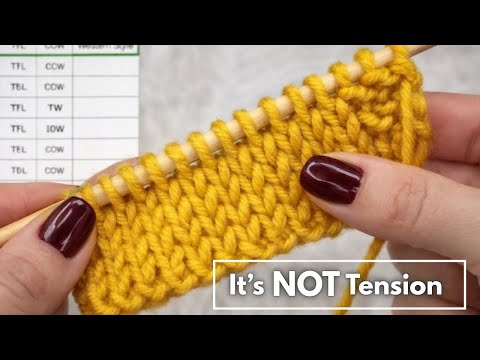
Fariba here from WatchKnitting. In today’s video, I’ll show you how to work this stunning textured chevron pattern.
🧶 Pattern Basics
- Multiple: 16 stitches + 2
- Repeat: 6 rows
- Start on the wrong side
- Row 1 and all odd-numbered rows: Purl across
- Pattern rows: Row 2, 4, and 6 (all knit stitches with crossed stitches)
The pattern is created using simple crosses over two stitches:
- C2L (Cross 2 Left): Knit the stitch underneath, slip the one on top
- C2R (Cross 2 Right): Similar technique, but leaning in the opposite direction
🔁 Row Breakdown
Row 1, 3, 5: Purl across
Purl across, picking up the edge stitch at the beginning and finishing with a knit stitch.
Tip: Keep your purl stitches loose to help minimize curling. From Row 3 onward, make the slipped stitches even looser when purling.
Row 2 – Where the magic begins!
We begin shaping the chevron lines.
- Slip the edge stitch
- Row 2: [C2L, K1] x2, C2L, C2R, [K1, C2R] x2
- End with K1 for the edge
Tip: The right-leaning lines are made with C2R; left-leaning lines with C2L. Pay close attention in the center—there’s no knit stitch between the two center crosses
Row 4 – Shifting the lines
We shift the stitches by one:
- Slip the edge stitch
- Row 4: K1, [C2L, K1] x2, K2, [K1, C2R] x2, K1
- End with K1 for the edge
Note: This row marks the midpoint where the lines meet and begin to shift inward.
Row 6 – Final row of the repeat
We shift the pattern once more by adding another knit stitch at the beginning:
- Slip the edge stitch
- Row 6: K2, [C2L, K1] x2, [K1, C2R] x2, K2
- End with K1 for the edge
By now, the lines have shifted closer together, creating that beautiful chevron effect.
🌀 Pattern Logic
After Row 6, return to Row 1.
- New crosses are introduced in Row 2, which starts with three knit stitches
- Rows 4 and 6 shift the lines gradually inward
- Once you understand the rhythm, the pattern becomes intuitive and easy to follow!
💬 Final Thoughts
I hope you give this pattern a try and enjoy working on it. Thanks so much for following along! Stay tuned for more cozy tutorials, and as always—
have a wonderful day!