Welcome back, followers! I’m Fariba from Watch Knitting. In this tutorial-style post, we’ll knit a cute pixie hat worked flat on straight needles—no circulars needed. The hat features a repeating ridge texture that looks great in bumblebee or acorn colorways and is perfect for quick gifts.
Materials
- Yarn: Worsted weight (number 4) for most sizes; you can also use a light worsted/DK (number 3) for a finer look
- Needles: 4 mm straight needles
- Notions: Tapestry needle, scissors, measuring tape
Gauge & Sizing
- Pattern is based on closest multiple of 6 + 5 stitches.
- Length before crown (guideline):
- Infant: ~16–17 cm (6.25–6.75 inches)
- Child (about 7 years): ~19 cm (7.5 inches)
- Adult: ~20–22 cm (8–8.75 inches)
Suggested Cast-On Counts (flat)
- Infant (0–12 mo): 65 sts
- Toddler (1–3 yr): 77 sts
- Child (4–6 yr): 95 sts
- Older Child (7–10 yr): 107 sts
- Teen/Adult S: 119 sts
- Adult M/L: 131 sts
Adjust by ±6 sts to keep the ridge repeat intact.
Abbreviations
- K – knit
- P – purl
- st(s) – stitch(es)
- rep – repeat
- RS/WS – right side / wrong side
- Sl3 wyif – slip 3 stitches purlwise with yarn in front
- K2tog – knit 2 together
- Lift – from the RS, lift the horizontal strand (created on the WS) from back to front onto the left needle.
- Lift & K2tog – lift the horizontal strand onto the left needle, then knit it together with the next stitch (treat as k2tog) to form the ridge.
- edge – work first and last stitch as knit on every row (for a neat selvedge)
Notes
- Work the hat flat, then seam the side and top to form the pixie point.
- For a neat edge, keep a consistent tension on the edge stitches.
- Brim option: Brim (1 inch ribbing): work K1, P1 for 1 inch (2.5 cm).
Instructions
Cast On: Using a long-tail cast on with both needles held together, cast on the stitch count for your size (see top chart). Remove one needle and begin.
Brim (optional): Work K1, P1 ribbing for 1 inch (2.5 cm).
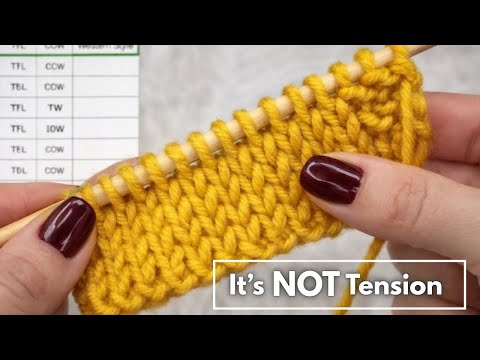
Body – Repeating Ridge Texture
Work the following rows. Rows 1–10 establish stockinette with horizontal strands on WS to prepare the ridge. Row 11 forms the ridge by lifting and decreasing.
- Row 1 (RS): Knit
- Row 2 (WS): edge, rep (P3, Sl3 wyif), P3, edge
- Row 3, 5, 7, 9 (RS): Knit
- Row 4, 6, 8, 10 (WS): Purl
- Row 11 (RS): edge, rep (K4, Lift & K2tog, K1), K3, edge
Repeat Rows 1–11 for pattern. For an offset look, shift the WS Row 2 “Sl3 wyif” groups between the previous strand positions every other repeat.
Work to Length: Continue in pattern until the total length so far is your target depth (see “Gauge & Sizing”), e.g., ~19 cm (7.5 inches) for a 7-year-old.
Crown Shaping (Decreases)
Work decreases on RS rows until 8–10 sts remain.
- RS: K2tog across evenly spaced (or work ssk/k2tog at each edge) to begin taper; WS: purl back.
- Continue decreasing on every RS row as preferred (e.g., edge, k2tog, knit to last 2 sts, k2tog, edge), purling WS rows, until 8–10 sts remain.
Pixie Tip: Knit straight for 2–3 cm (about 1 inch) on the remaining stitches to create a little square/point before binding off (optional, for a sharper pixie look).
Bind Off: Bind off all stitches knitwise on the next RS row. Leave a long tail for seaming.
Finishing:
- Fold the hat in half lengthwise.
- Seam the side edge with mattress stitch.
- Seam the top edge to form the pixie point.
- Weave in ends. Add a tassel or pom-pom if desired.
Tips
- Keep Sl3 wyif relaxed to avoid drawing in the fabric too tightly.
- For deeper ridges, work longer segments of stockinette (Rows 3–10) between Row 11 ridge rows.
- For closer ridges, shorten those segments to about 1/2 inch (1.25 cm) between ridge rows.
Video Tutorial
Watch the full step-by-step video for cast on, ridge formation, and crown shaping